How to Install a Performance Exhaust in a Boat?
Your boat’s performance exhaust may need upgrading. It’s a smart move for a smoother engine sound, better power delivery, and a cleaner engine room layout. And also improve the lifespan of your engine and protect important engine parts from heat and water damage.
But before you start, it's crucial to understand how marine exhaust systems work, especially the role of wet versus dry designs, mixing elbows, and water-injection points, and why proper marine exhaust installation matters not just for performance, but for safety and system integrity.
This post is all about the installation guide, the right parts, the tools you’ll rely on, and the exact steps to install a performance exhaust correctly. So keep reading.
Wet vs. Dry Exhaust: Which System Is Right for Your Boat?

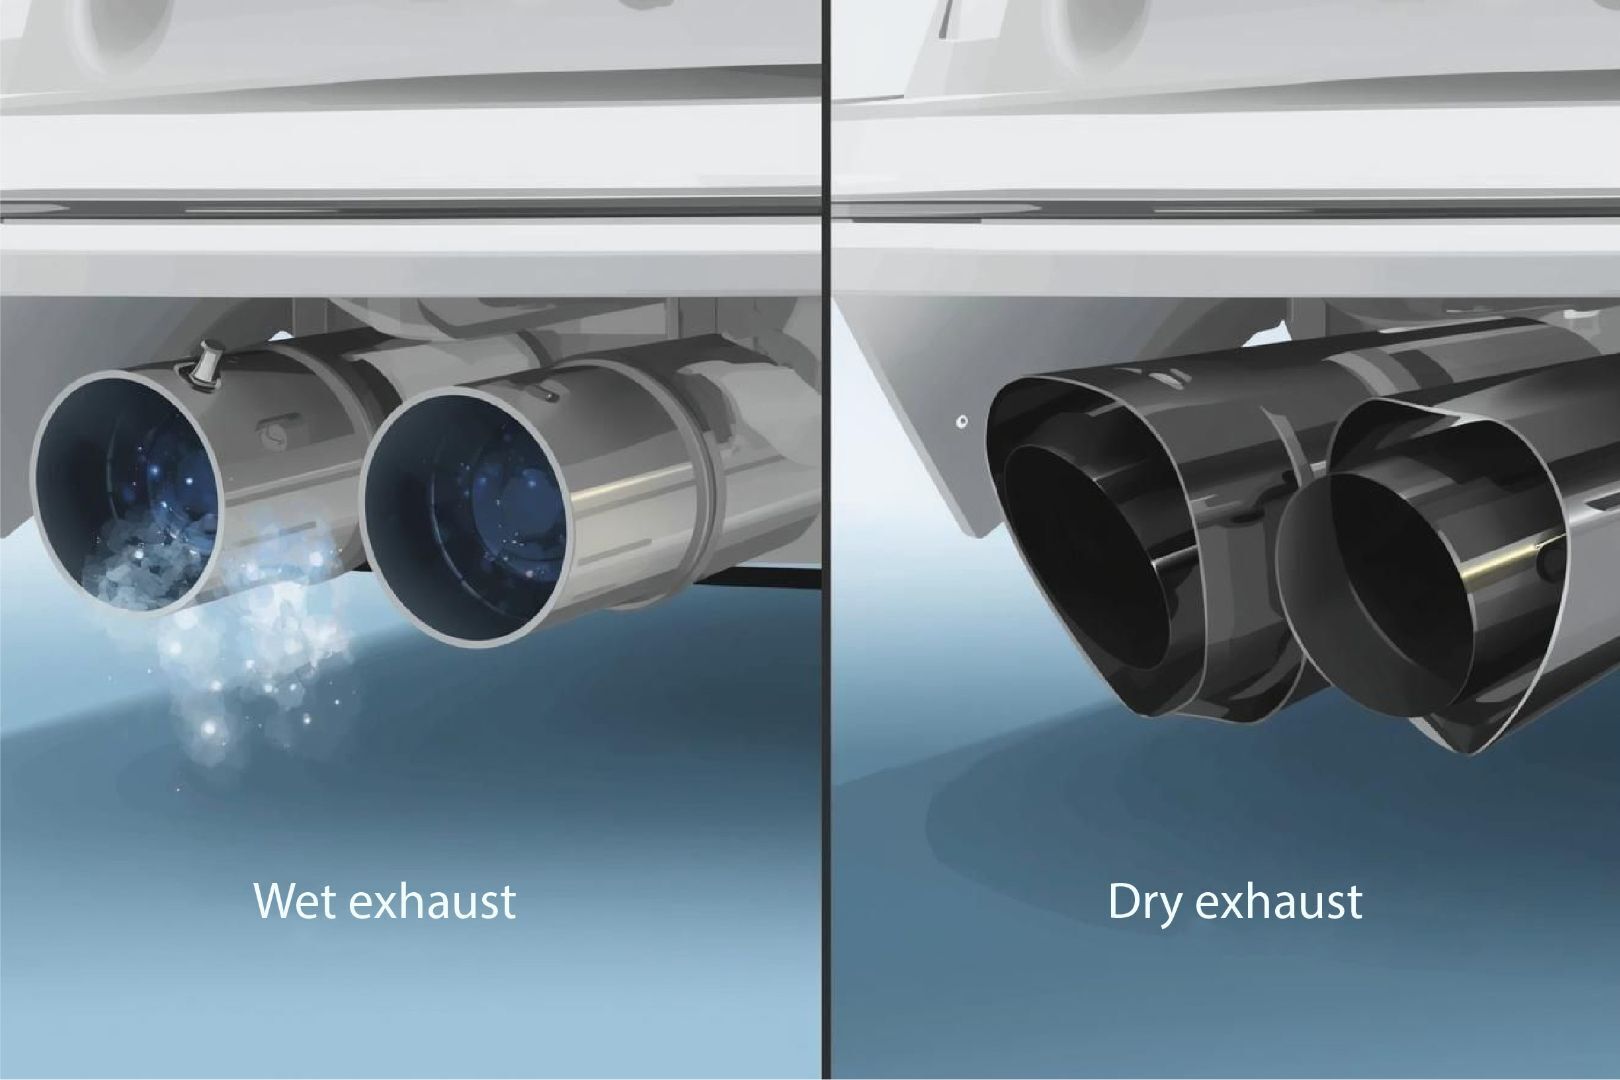
The exhaust system for a boat isn’t just about noise or looks; it’s about how those multi-engine powerhouses perform and how long they keep running smoothly. On the water, two primary exhaust system types are used: wet exhaust and dry exhaust.
- Wet exhaust is what you’ll see on most pleasure boats. Cooling water mixes right in with the exhaust gases, keeps the temps low, takes some edge off the sound, and makes the ride easier for people onboard. It’s reliable, proven, and good if you’re not chasing every last drop of horsepower.
- Dry exhaust, on the other hand, is all about pushing that engine’s punch straight out. Hot gases stay separate, which means less backpressure on the motor. That’s where the performance kicks in: quicker throttle, stronger throttle response, and higher output at speed. But it runs hotter, louder, and not every hull design or marina setting allows for higher noise levels.
Some setups even go halfway with dewatered or thru-hull tips, increased noise, and a sportier appearance, but still with cooling in place to keep things under control. The exhaust is cooled with water inside the boat, but before it exits through the transom or hull, the water is separated out. What you see and hear are the hot gases venting through polished thru-hull tips, often producing the aggressive sound performance boat owners are after.
Pre-Install Inspection Checklist – Parts, Tools, and Safety Checks
Before you begin removing bolts or trimming hoses, you need to slow down and take stock. A performance exhaust install on a boat isn’t just keeping pipes together; it’s about checking every inch so nothing creates a problem later when you are on the water.
- Parts check first. Lay out the exhaust manifold kit, risers, elbows, exhaust hose, clamps, gaskets, and that anti-siphon loop if your setup needs one. Make sure they’re all marine-grade, not automotive-grade substitutes, and stick to reliable engine brands. If one clamp looks rusted before it’s even on, toss it and grab a better one. The weakest component will likely fail first, often under demanding conditions.
- Tools check. Don’t start if you don’t have the basics – a torque wrench, a socket set, marine sealant, hose cutters, and a grinder (if you need to trim an outboard engine’s fittings). Keep spare stainless fasteners and double clamps ready. If the bilge is tight and dark, a headlamp makes tight spaces easier to work in. A backpressure gauge isn’t always available, but it’s highly recommended to measure exhaust performance after installation.
- Safety check. Disconnect the batteries before you wrench near the motor. Bilge is dry, no fuel vapors hanging around. Keep a fire extinguisher right by your feet. Gloves help, but more important is patience – don’t rush clamps or fittings. Loose hoses or crooked risers can mean water sneaking back into the engine, and that can cause catastrophic engine damage.
Once this checklist is ticked off, then you’re clear to get into the heavy work.
Step-by-Step Installation of a Performance Exhaust in a Boat

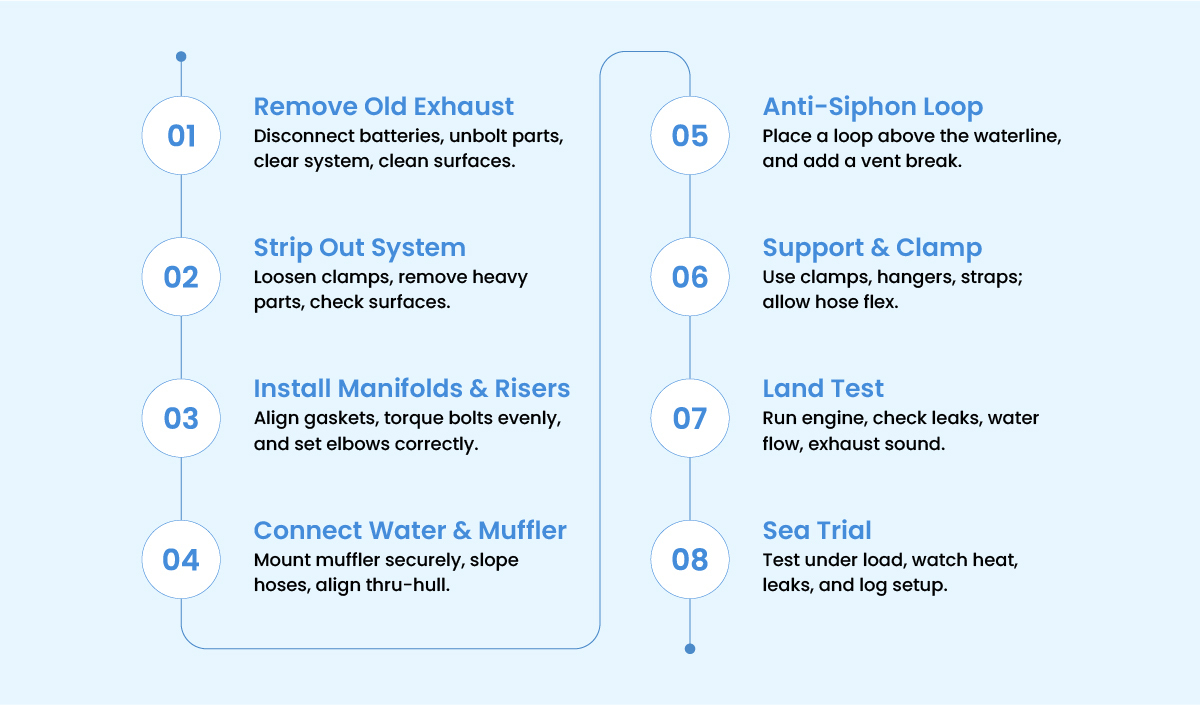
Below are the steps in the same order that any professional marine mechanic would tackle them. Keep the parts laid out, tools sharp, and don’t skip around, because the sequence matters.
Step 1: Remove the Old Exhaust System
Start by disconnecting the batteries; no sparks near fumes. Then get eyes on the old system, manifolds, risers, elbows, and hose runs. Spray penetrating oil on the bolts, since many may be corroded. Don’t crank them cold, that’s how you shear studs. Give it time, break the seal slowly.
When you unbolt the manifolds, catch the gaskets; they’ll likely come apart in pieces, but don’t let chunks fall in the intake or ports. Same with risers and elbows, take them off clean, watch how they were clocked, so you know the angle setup before. Label hoses if routing is complex, as it saves you later.
Get the exhaust hose out of the bilge; it’s heavy, water-logged sometimes, and can retain fuel odors. Toss it aside; the old components should be discarded. Once all the pieces are out, scrape the mounting surfaces on the head clean; no gasket goop left, the surface must be clean, bare metal.
Step 2: Strip Out the Old System
Now start breaking the clamps loose on the old hose. Some of them will fight you, rusted in place. Spray a little penetrating oil, let it soak, then muscle them off.
When you pull manifolds or risers, remember they’re heavy and sometimes have water sitting inside. Don’t just yank, support with one hand while you back out bolts with the other. Dropping a riser on a fiberglass deck can cause significant damage beyond exhaust-related issues. Handle with care.
Stack old parts off to the side; don’t clutter your working space. And check the sealing surfaces as you go. If the manifold face is pitted deeply, you’re wasting time bolting shiny new parts onto it.
Step 3: Bolt in Manifolds, Risers, and Elbows
Now comes the first build-up. Clean off gasket surfaces, scrape off old sealant, and wipe it down. Drop the new gaskets on, line up the exhaust manifolds or risers, and snug them down. Do not overtighten the bolts at this stage. Work in sequence, smartly, until everything’s seated evenly.
Use a torque wrench when you do the final pass. It may feel slower, but uneven torque can warp the flange and cause exhaust leaks during operation. That’s not a maybe, that’s a sure thing.
When you install elbows, watch orientation. The elbow angle decides where that water is gonna dump and how the hose lines up. One wrong angle and you end up with a hose kink or a low belly that fills up with water.
Check out these Marine Parts for Elbow Installation
- New GLM / Mercruiser Exhaust Elbow Intermediate Part
- New OEM / Mercruiser Exhaust Elbow Gasket OEM
- New GLM / Mercruiser Exhaust Elbow Screw Part
Step 4: Hooking up the Water Injection and Muffler
Performance exhaust or not, you still gotta deal with cooling water. This is where a lot of DIY jobs go sideways. Keep in mind, water has to enter at the right spot, not too close to the motor and not too far back.
Mount the waterlift muffler solidly. Ensure the muffler is properly supported and not left suspended on the hose. Line up the hose slope: you want a steady downhill run, no dips, no spots where water pools. Use clamps and brackets to keep it locked.
If your setup’s thru-hull, this is where the style meets the job. Line up your transom exit, mark it true, and cut only once. A crooked thru-hull tip not only looks cheap but also sprays weirdly and rattles.
Step 5: Anti-Siphon Loop and Vent Break
This one separates the clean installs from the dangerous ones. The loop has to sit above the loaded waterline; that’s the rule. If it’s too low, when the boat sits heavy, water sneaks back up into your motor. Water backflow can cause severe damage, including bent rods, cracked cylinder heads, and complete engine failure.
Mount the loop solid, and don’t cheap out on the vent break. Keep it where you can reach it for maintenance. You want it working every time, not just “most of the time.”
Step 6: Clamps, Supports, and Vibration
Exhaust hoses are heavy and must be adequately supported. If you let it dangle, the weight pulls on fittings, chews up clamps, and after a few runs, you’ll be chasing leaks. Add hangers or straps where you need them. Stainless clamps, doubled up if space allows, snugged tight but not cutting into the hose.
Don’t forget the motor moves. A rigid pipe straight off the block will crack or pull. Always give it some flex, some way to soak up vibration. That’s why you use a good marine exhaust hose and not a rigid tube like in a car.
Step 7: Fire Up and Test Run
Before launching, start the engine using a hose connection or a test barrel if compatible. Watch for leaks around clamps, listen for hiss or spray. Exhaust water should be flowing clean, no steam clouds, no trickle back into the engine.
Once you’re confident on land, drop her in and do a slow idle around the dock. Then run up RPMs step by step, listen at the stern, check water flow, and feel the fittings. Any rattle or hot spot, shut down and fix it now.
A performance exhaust should improve airflow efficiency and engine response, without allowing water intrusion into the motor.
Step 8: Sea Trial and Final Inspection
After the dockside test, open it up on the water. Pay attention to throttle response and how she clears out. Check again for leaks when you tie back in. Touch the hoses; warm is normal, burning hot is not.
At this point, your install is either good or it’s showing problems. Don’t ignore small leaks or drips, thinking they’ll seal themselves. They won’t. Go back, retighten, reseat if needed.
When you’re done, log your setup. Note hose lengths, clamp positions, and part numbers. Next time you service or swap, you’ll thank yourself.
Safety & Regulations You MUST Know Before Starting
Follow the safety rules before doing anything to install a better performance engine.
- The entire exhaust system must be gas-tight to the hull interior; no leaks allowed. This ensures exhaust (and nasty stuff like CO) cannot sneak back inside your boat.
- Your system must be built so back-pressure stays within the engine maker’s limits, or you risk overheating, reduced performance, or worse failures.
- All fittings, joints, clamps, and supports need to be accessible for inspection and repair, none of that buried-under-deck stuff. And supporting parts must stand up to vibration and heat without being combustible.
- When exhaust parts get over ~200 °F (93 °C), there must be non-combustible guards, jacking, or covers nearby, so nobody burns themselves (or your gear catches fire).
- Hoses used in wet exhaust must meet SAE J2006 (Marine Exhaust Hose) or UL 1129 (Wet Exhaust Components) specs, no cutting corners with cheap hose.
FAQs
How long does it take to install a performance exhaust?
Most boat exhaust installs take 4–8 hours, depending on hull space, tools ready, and your skill level. Tight bilges or custom manifolds can stretch it longer.
Can I install an exhaust by myself?
Yes, with solid mechanical skills, the right tools, and safety checks, you can tackle it. Still, many boaters call pros when riser angles or backpressure tolerances get tricky.
How much horsepower does a performance exhaust system add?
On marine engines, a performance exhaust can free up 5–15% more horsepower. Gains depend on setup, exhaust flow, and matching the system correctly to your engine size.
Conclusion
A performance exhaust kit for your boat is not just about the look and sound it provides—it’s designed to protect your engine, enhance efficiency, and give you maximum value on every trip out on the water. With the right parts, proper tools, and step-by-step installation, your boat will run reliably and perform at its best.
Need expert guidance or high-quality marine exhaust parts? Call our team at 270-618-5200 and we’ll help you get the job done right the first time.
Posted by Brian Whiteside


