Yamaha 4-Stroke Outboard Season Breakout Guide
If you own a boat powered by a Yamaha 4-stroke outboard, you probably already know the thrill of pure power over water, the quiet hum, the smooth response, the confidence that comes from reliable performance. But here’s the catch: that trust is only as good as your maintenance. Every season, when you bring your engine out of storage or idle it after long periods, there’s a moment of vulnerability. This is when small issues can become expensive failures, unless you’ve properly checked your Yamaha engine parts and followed the right procedures.
That’s where a season breakout checklist becomes essential. By “season breakout,” the steps you take post-storage and pre-season to bring your engine safely back into service. It’s not just about starting it up; it’s about preparing, safeguarding, inspecting, and testing to ensure you aren’t greeted by a surprise leak, overheating, or worse, a breakdown.
In this guide, we'll walk through every system, fuel, cooling, ignition, propeller, and lower unit, step by step.
Understanding Your Yamaha 4-Stroke Outboard

A Yamaha 4-stroke outboard works through four main stages: intake, compression, combustion, and exhaust. The major difference between 2-stroke and 4-stroke engines have an internal oil sump and a dedicated lubrication system. Key components include:
- Oil sump & crankcase: holds your engine oil, lubricates bearings, camshafts, etc.
- Valvetrain (camshaft, valves, lifters): controls airflow in/out of cylinders.
- Cooling jacket & water passages: raw water is drawn in, passes through jackets, and carries heat out.
- Fuel systems & injectors: deliver clean, controlled fuel.
- Ignition & electrical systems: spark plugs, wiring, battery, sensors.
- Lower unit/gearcase: houses the gears, prop shaft, water pump, seals, and propeller.
Because the oil system is internal and not mixed with fuel, it demands more care, oil quality, seals, and cleanliness matter. Moisture, stale fuel, or corrosion inside can damage bearings or valves.
Yamaha’s Service Schedule / Maintenance Intervals
Yamaha publishes periodic service intervals that serve as the backbone of a maintenance plan.
| Interval | Equivalent Time (“whichever comes first”) | Key Tasks |
| 20 hours / ~3 months | The “first break-in” service | Inspect all systems, change engine oil, lower unit oil, greasing, visual check, flush |
| 100 hours / ~1 year | Basic annual service | Full oil & filter change, spark plugs, fuel filters, inspect/replace water pump/impeller, thermostats, anodes, grease points |
| 300 hours / ~3 years | Advanced checks | Replace water pump housing/impeller, diaphragm fuel pump, deeper inspection of internal components |
| 500 hours / ~5 years | Long-term overhaul tasks | Valve clearance check, replace VST filters & oil control valves, internal anodes |
| 1000 hours | Major rebuild or heavy service | Timing belts, exhaust manifolds, and broad inspections (especially on large engines) |
If your engine is a 2-stroke, HPDI, or EFI version, many steps are similar, but fuel mixing, injector cleaning, or different lubrication apply. This guide is tuned for the Yamaha 4-stroke design. Check your owner’s manual for deviations before applying the steps.
Pre-Breakout Preparations (Before You Start)
Before you even remove the cover or pull the prop, there are a few preparatory steps to minimize risk and maximize success.
Safety & Regulations
- Personal safety first: gloves, eye protection, good ventilation. Fuel fumes are volatile.
- Fuel disposal / environmental rules: If you’re draining old fuel or oil, store it in proper containers and dispose per local regulations. Don’t dump fuel or used oil into soil or waterways.
- Compliance/emissions/run-in rules: Some regions require emissions compliance or have rules about running engines outside certain zones. Be sure you’re allowed to run your motor in your area, and check any pollution or noise restrictions.
Tools, Parts & Supplies
Gather everything before you start:
- Fresh engine oil, gear lube, filters
- Fuel filters, clamps, primer bulbs (for priming the fuel system)
- New sacrificial anodes
- Gaskets, O-rings, sealant
- Anticorrosion spray, grease
- Basic hand tools, torque wrench, catch pans, rags
- A battery charger or a fresh battery
- Documentation, your owner’s manual (every model has nuances)
Prep your working area, well-lit, level, and dry. Label or photograph connections if you need to unhook wiring or linkages. A small mistake now can cost a cylinder or two later.
Step-by-Step Season Breakout Checklist
Here’s where things truly matter. The care you put in now saves you headaches when you’re out on the water. Step by step, we’ll look at each system so you don’t have to wonder, will it start right, stay cool, or hold up through the trip?
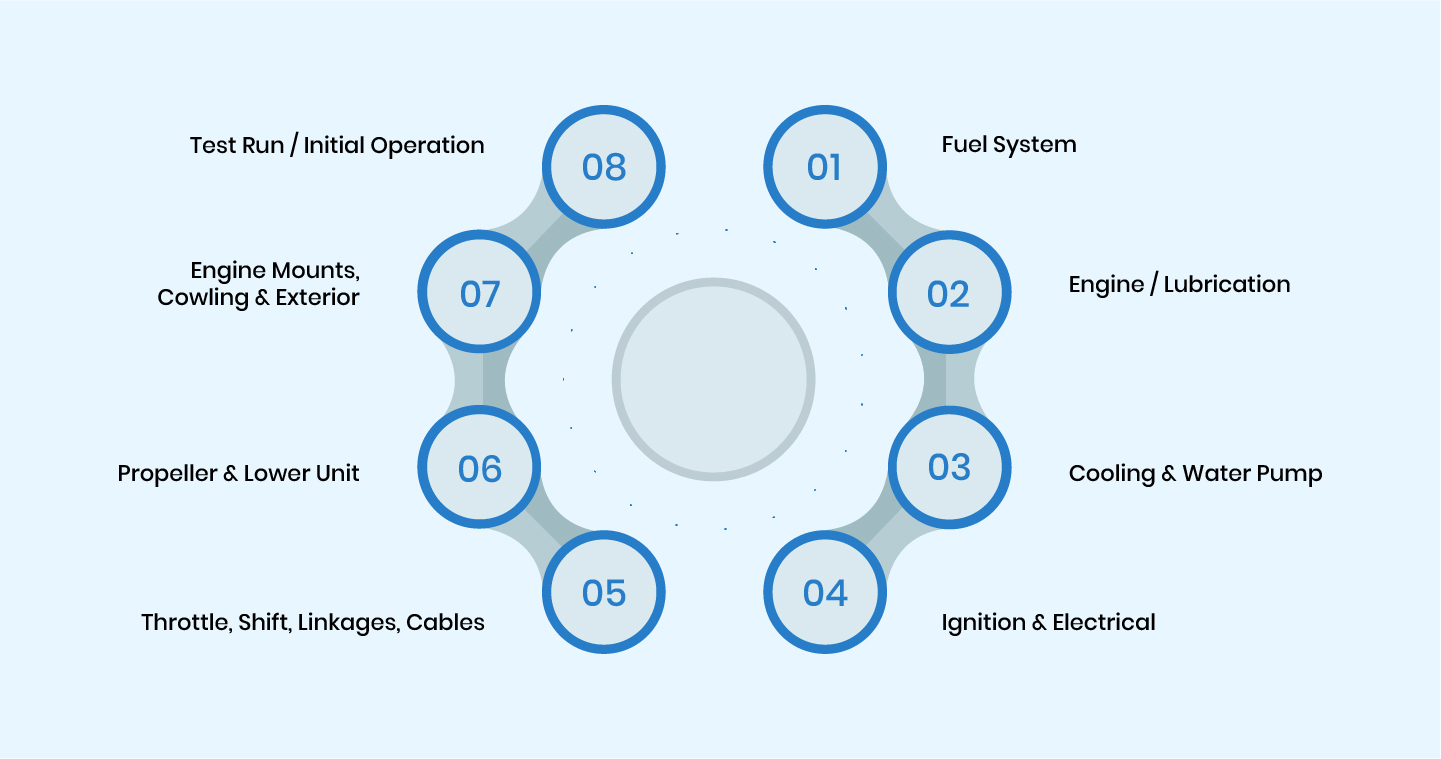
1. Fuel System
Your fuel system is where failure often begins: bad fuel, clogged filters, leaks. Treat this carefully.
Check every fuel hose for cracks, brittleness, swelling, or chafe marks. Replace any section that looks marginal. Tighten or swap out weak clamps. Squeeze the primer bulb: it should firm up when pressed; if it never does, you may have a leak or air intrusion.
Even if your filters look okay, replacing them gives you peace of mind that no hidden water or gunk will reach your engine. Yamaha’s “Fuel & Fuel System” guidance emphasizes filtration as one of the most common trouble sources.
When fuel sits for weeks or months, it can break down or collect water. Ethanol fuels make this worse. Add a marine-grade stabilizer; Yamaha has reliable options to stop oxidation and fuel separation. If the gas seems stale or has a sour smell, it’s better to drain and refill the tank.
When installing filters or working on lines, fill the filter about three-quarters full with stabilized fuel. Then pump the primer bulb until it feels firm. That helps reduce air pockets. Keeping your fuel system clean and well-primed helps improve the life of your outboard engine by preventing lean conditions and injector damage.
2. Engine / Lubrication
Your engine is the heart of the system; lubrication is its lifeblood.
If you store oil in the engine, drain and replace it before you start it. Old oil carries acids, moisture, and contaminants that are your enemy. Use the OEM or recommended marine-grade oil. Yamaha’s Maintenance Matters page mandates changing engine oil every 100 hours (or annually) for 4-stroke outboards.
Drain the lower unit gear oil fully. Check the drained fluid; if it’s milky or has water, that’s a warning. Refill with clean marine gear oil to spec.
Every grease point: tilt/trim pivots, steering arms, linkages. Grease pushes out moisture and keeps movement free. Don’t skip this, neglected greasers seize over time.
3. Cooling & Water Pump
Effective cooling is nonnegotiable; if you overheat, severe damage follows.
If your impeller is old, cracked, or worn, replace it now; it’s cheap insurance. Yamaha’s 100-hour service recommendations include impeller checks.
Connect a hose and adapter or a flush muff, then run fresh water through your engine while it idles in neutral. Let it flush for about 15 minutes. This step helps wash out any salt or mineral deposits that may build up, even in lakes or rivers. Check every hose for cracks, soft spots, or bulges. Tighten the clamps, and don’t skip replacing the water pump when it’s due. If the thermostat comes out easily, test it, and never ignore when to replace an outboard water pump
4. Ignition & Electrical
Everything starts with power and spark; don’t gamble here. Make sure the battery is fully charged and the terminals are clean. If it sat during storage, load test it. Replace if weak. The charger must hold voltage under load.
Check every connector and clean away any rust or buildup. Add a small amount of dielectric grease once everything looks clean. Make sure the kill switch and lanyard work exactly as they should. Even a loose or slightly corroded connector can cause your system to fail now and then.
Remove plugs, inspect condition, clean or replace. Use anti-seize on threads where recommended. Gap them to spec. Ignition problems often trace back to worn or fouled plugs.
5. Throttle, Shift, Linkages, Cables
These control systems define your response and safety. Cables get stiff with time and corrosion. Lubricate inside the housing, through full motion. Ensure the shift and throttle move smoothly without binding.
Verify that the shift/neutral safety works. Confirm full range of motion from idle to full throttle. Adjust if necessary.
6. Propeller & Lower Unit
Don’t forget what connects power to water, the prop and the lower gearcase.
Remove prop, look for dings, bends, and fishing line wrapped around it. Small nicks can be smoothed; large damage means replacement. Clean old grease, reapply fresh waterproof grease, slide the prop back in place, and torque the nut correctly.
Look at sacrificial anodes on the lower unit; if they’re more than half eroded, replace them. Check skegs for damage. Ensure fasteners are tight.
7. Engine Mounts, Cowling & Exterior
These external parts protect everything inside. Check the Yamahe engine parts mount bolts are torqued to spec, inspect for signs of stress or corrosion.
Clean inside the cowling, dust, insects, spills, debris all find their way in. Dry thoroughly. On the outside, spray exposed metal parts with corrosion inhibitor (Yamashield or equivalent). Make sure cowling latches cleanly and seals are intact. A loose or leaky cowling invites moisture and damage.
8. Test Run / Initial Operation
Here’s the critical moment: your first check under power. If you did everything right, this will go smoothly.
Double-check fluid levels, clamp tightness, fuel lines, and battery connection. If your model allows, crank with ignition disabled to circulate oil or verify priming.
Once it fires, turn on the water supply or ensure the cooling flow. Run at fast idle while flushing. Avoid high revs until warmed. Let the engine warm gradually. Monitor oil pressure, coolant flow (look for an adequate stream out exhaust or telltale), and listen for unusual noises or vibrations.
Don’t hammer full throttle. Bring the load slowly; smooth acceleration helps seat seals and gaskets. After the shutdown, check for leaks, verify no hardware loosened, inspect oil color, water in the lower unit, vibration, or odd smells.
Common Mistakes & How to Avoid Them
In all my years helping boaters, I’ve seen a few recurring pitfalls. Spot them before they snag your season:
Skipping oil changes or delaying service: You may “get away” with skipping one, but the next season often reveals hidden damage. Fresh oil is your engine’s lifeline.
Using automotive oil instead of marine-grade (Yamalube, etc.): Marine oils contain anti-corrosion, anti-wear, shear-stable additives that ordinary engine oils lack. Yamaha emphasizes the use of Yamalube for optimal performance.
Ignoring sacrificial anode wear or corrosion: Let the anodes erode completely, and your engine’s metal parts become the sacrificial ones.
Using stale fuel or neglecting stabilizers: Ethanol fuel breaks down, forming varnish, gums, or water contamination during storage.
Running engine too aggressively on first start: If you rev to full throttle before warm-up and load acclimatization, you risk damage to seals, pistons, or bearings.
FAQs
What is the average life of a Yamaha 4-stroke outboard?
With proper maintenance, many owners report lifespans from 1,500 to 3,500 hours (or more) depending on usage, environment, and care. Some high-quality marine engines even exceed that with diligent servicing.
Are Yamaha 4-stroke outboards reliable?
Yes, Yamaha has a strong reputation in the marine industry. Their parts availability, service network, and technology (like corrosion protection and ECMs) make them dependable when well-maintained.
How often should a 4-stroke outboard be serviced?
Yamaha recommends core services every 100 hours (or annually, whichever comes first). New engines often get a 20-hour check and service. Additional items (impellers, anodes, valve clearances) appear at 300, 500, or 1,000-hour intervals.
Conclusion
A 4-stroke outboard season checklist can save you a lot of trouble. Go through it one step at a time, and you’ll keep your motor healthy and your days on the water stress-free. The magic happens when you stop reading and start doing.
Explore our complete catalog of outboard parts, or call us at 270-618-5200. We will help you select the perfect match for your Yamaha 4-stroke.
Posted by Brian Whiteside